How to make a raised bed
Building raised beds is a great way to add more growing space to your garden, especially if your soil is poor. If you plan ahead, constructing them can be accomplished in a weekend, and you can quickly get growing fruit, vegetables, cut flowers or even small trees and shrubs.
Quick facts
- Raised beds can be built at any time of year, but most gardeners find it convenient to do it during winter
- It's best to construct beds atop free-draining ground; if building them on a hard surface, make sure to add plenty of drainage holes
- The most suitable size and depth for your raised beds depends on what you plan to grow in them
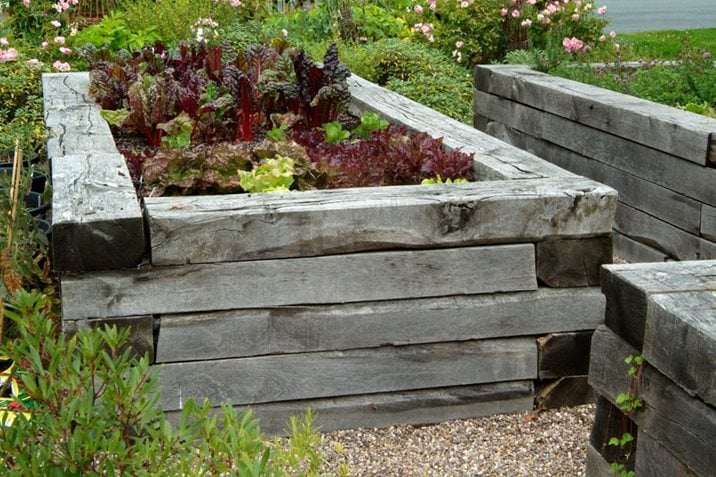
- Pressure-treated timber is a popular and durable material for the frame, but other options include bricks, stone, scaffold boards and recycled plastic
- A general potting mixture of topsoil, organic matter and sharp sand is suitable to fill most beds
Jump to
Why grow in raised beds?
Raised beds are simply enclosed, freestanding beds constructed above ground level. They make attractive features in any garden, and are particularly popular for growing vegetables, soft fruit, cut flowers, alpines and ericaceous plants. Raised beds are also easier to manage than open ground, due to their limited size, and are more accessible for gardeners with restricted mobility.
They can be used to:
- Improve growing conditions, as you can fill them with a fertile, free-draining soil mixture - especially good if your garden soil is poor, or heavy and prone to waterlogging
- Increase soil temperature in spring - good for getting veg off to an early start
- Match the soil to the plant, so you can grow plants that wouldn't usually thrive in your garden soil
- Create a nursery bed for cuttings and young plants
- Keep small plants nearer eye level so they can be better enjoyed - flowering alpines are a good example
- Make growing crops easier, as it's simpler to practice crop rotation and easier to cover beds for protection from frost and insect feeding damage
Getting started with raised beds
Before you add raised beds to your garden, there are a few things to consider:
- Aspect and orientation - most fruit, vegetables and cut flowers need full sun, so position beds in the south- or west-facing parts of your garden, away from the shade of overhanging trees. Run long beds north to south for even sunlight levels
- Size - long runs of beds can be inconvenient to manage, so opt for multiple smaller beds. Widths of less than 1.5m (5ft) should allow you to easily reach the centre without having to stand on the soil
- Depth - 30cm (1ft) is deep enough for dwarf bulbs, salad leaves and strawberries, but most plants, especially fruit bushes, shrubs and small trees, need 45cm (18in) or more.
- Pathways - aim to make paths between beds at least 45cm (18in) wide to accomodate a wheelbarrow, and at least 1m (3½ft) for a wheelchair, if needed
Timber is the most popular material for constructing raised beds and is very versatile. Pressure-treated softwood sleepers are an attractive and economical alternative to hardwoods like oak, and will last for many years.
Untreated wood, like recycled pallets and scaffold boards, has a shorter life than treated wood, but can be painted with a preservative to extend its lifespan - just remember to line the inside of the wood with old compost bags or other recycled plastic sheeting to prevent leaching into the soil.
Ready made timber kits are an increasingly popular choice for beginner gardeners and small scale projects. They can simply be screwed together and placed in the desired spot.
Tools you need to build a timber-framed raised bed
-
Durable timber, such as softwood sleepers or reclaimed hardwood, pre-cut to the required lengths
-
Spade
-
Canes and string
-
Spirit level
-
Electric drill and coach screws
-
Batons (to secure the timber layers vertically, if using more than one layer)
-
Rubble, subsoil or inverted turves (for filling the base of deep beds)
-
Topsoil, or spare soil from elsewhere in the garden
-
Organic matter, such as garden compost, leafmould or well-rotted manure
- Sharp sand
You can build raised beds at any time of year, but most gardeners prefer to do it in winter when they have more time - just avoid working the soil if it is very wet or frozen. If your garden has heavy soil and waterlogging is a problem, it's best to build your beds in late summer when the ground is drier and more easily cultivated.
A step-by-step guide to making a timber-framed raised bed
-
Dig out a shallow trench
Mark out the shape of the bed using canes and string, then dig a shallow trench to its exact dimensions, wide enough to accommodate the timbers.
-
Position the first layer of timbers
Lay the timbers into the trench and make sure they all align horizontally using a spirit level. Check the levels diagonally between the timbers as well as along their length.
-
Screw the timbers together
At each corner, drill through the end timber into the sleeper behind, at the top and bottom, to accommodate a couple of long, heavy-duty coach screws. Then screw the timbers together securely.
-
Add the second layer
If you want a second layer, put the timbers in place, making sure these overlap the joints below to give the structure extra strength. Screw in place, as previously. Repeat, if necessary, until the bed is the height you require. If using more than one layer, screw vertical batons inside each corner, to secure the layers together.
-
Prepare the base of the bed
Lift and remove any turf from the base of shallow beds, and lightly fork over the soil to loosen it.
For beds deeper than 50cm (20in), remove any turf and the underlying topsoil, replacing with rubble or subsoil to ensure good drainage and reduce the quantity of good soil needed to fill the bed. Finish by laying the turves upside down in the base so they can rot down and enrich the soil. -
Fill up the bed
A general potting mixture of three parts organic matter (such as garden compost, leafmould or well-rotted manure), two parts sharp sand and seven parts topsoil is sufficient for most raised beds. For alpines, bulbs and herbs, that like good drainage, double the proportion of sand. For deep beds, add-in any topsoil removed from the base. -
Leave the bed to settle
Fill the bed to around 5cm (2in) below the rim. Firm down the soil and leave it to settle for a couple of weeks, topping the level up again if necessary. Then you are ready to start sowing or planting.
Raised beds - frequently asked questions
What other materials can be used to build a raised bed?
Timber is the most popular material for constructing raised beds, but there are several other options:
Stone: both natural stone and stone prepared for wall construction can be used. Skilled labour is usually required for construction and footings are nearly always required (see 'Top tip' below). Generally the most expensive material.
Brick: strong, durable and can be used to create curved beds. Skills are needed for construction and footings are generally required (see 'Top tip' below). Engineering bricks are the most suitable as they are weather resistant. Domestic bricks are much cheaper but porous and therefore less durable.
Paving slabs: can be inserted on their side to create a reasonably deep and inexpensive bed with one layer. At least 15cm (6in) of slab needs to be buried in the ground for stability, leaving 45cm (18in) above soil level. As paving slabs often move over time, 30cm (1ft) deep concrete haunchings can be laid for extra stability, and metal plates fixed at each vertical joint.
Recycled plastic: several companies now offer 'sleepers' made from recycled plastic bottles. Different colours are available and some are finished to look like timber. Extremely durable and maintenance free, but fairly expensive and only available in certain sizes.
Can I build a raised bed on a hard surface?
Yes, but it's important to adjust the bed design and soil mixture to ensure good drainage and avoid problems with waterlogging. If constructing the bed from timber, drill plenty of holes in the sides of the bed to allow excess water to drain away. For beds made of stone or brick, leave gaps at 45cm (18in) intervals between the joints in the first two courses to act as drainage holes. Cover these on the inside of the bed with fine wire mesh, and heap gravel against the mesh when filling the bed, to prevent soil clogging them up.
Fill beds constructed on a hard surface with a mixture of three parts organic matter, four parts sharp sand and seven parts topsoil. Be prepared to refresh and replace the soil regularly, as you would when repotting a large container, to maintain good drainage.
Will I have to water more?
Plants in raised beds tend to suffer more quickly and more severely from drought than plants growing in the garden soil, owing to improved drainage, so it's important to keep an eye on watering needs. As with watering containers, it's a good idea to regularly check the moisture level about a finger's depth below the soil surface to see if additional watering is needed, and be prepared to water more following warm and windy weather when plants lose water more quickly.
If you're finding the soil is often dry, or your plants are showing signs of stress, add a layer of mulch to the surface of the beds to help conserve moisture.
Will fungi grow on my raised bed?
Saprotrophic fungi can colonise and rot down untreated timber, which softens it over time, so you may need to undertake occassional repairs to keep beds structurally sound if you use this material. However, spongy wood rotted by fungi creates valuable habitats for garden wildlife and retains water, helping to regulate the moisture content of the bed. If you're happy to undertake repairs every few years, then using untreated wood, whole logs or even fungi logs is a great way to create little wildlife havens in your garden, and may even help keep plant health problems away.
However, if you are struggling to control honey fungus in your garden, it may be best to steer clear of using timber to construct your raised beds and choose masonry or recycled plastic instead, in case the wood acts as an additional food source for the fungus.
A video guide to building raised beds
Discover how quickly you could add raised beds to your garden by watching this video on creating a raised bed from a self-assembly kit.
Get involved
The Royal Horticultural Society is the UK’s leading gardening charity. We aim to enrich everyone’s life through plants, and make the UK a greener and more beautiful place.